ENGLISH INFANTS, ENGLISH PRIMARY, ENGLISH INFANTS&PRIMARY, SPECIAL NEEDS, PARENTS

Mostrando entradas con la etiqueta SCIENCE. Mostrar todas las entradas

lunes, 19 de mayo de 2014

SENSORY PLAY AND SCIENCE WITH CORNFLOUR AND WATER

During my work placement in a Pre-School in the South of England I saw how with only cornflower and water and a bit of some paint or food coloring kids have lots of fun! It is very easy and quick to made. I totally guarantee that they will really enjoy! Give it a go and let me know what you think!

What you will need:
  • Plastic or metallic recipient or box
  • Cornflower(the one I used is from Lidl but you can use others)
  • Water
  • Paint or food coloring  (looks more colourful and attractive for children)
How to make it:


Goop is one of the easiest play recipes to make at home or in the school. All you need is cornflour  and water. There are some recipes that suggest mixing one part cornflour  with two parts of water. In the Pre-School and I don’t measure the ingredients at all when we make this. Simply pour a recipient or box the  cornflour and then adding the water very gradually until it all mixes together into a soup-like consistency.  It will go hard when you try to stir it, but go runny when you stop putting it under pressure.  until it all mixes together into a soup-like consistency. We also added a little liquid food colouring but that’s optional.

IMPORTANT:  You  want to make sure that your cornflour is actually derived from corn. That may sound like a weird thing to say but some manufacturers will label a box as cornflour or cornstarch but in fact the flour is derived from wheat. If you use wheat based flour your mixture won’t have the same properties as goop.


sábado, 19 de abril de 2014

SID THE SCIENCE KID


The Sid the Science Kid  is a television series and interactive website for children 3-6 and the adults who care for them. It is divided into two sections: Teachers and Parents. Also provide many opportunities for teachers to introduce or reinforce early science concepts in the classroom.
The resources found in this collection help you explore each of the Sid concept cycles with activity ideas, video clips, and online games.

TOPICS IN THIS COLLECTION

Help your  Pre-school students think, talk, and work like scientists do with activities that explore "Science Tools" with the Science Adventures curriculum. Students will learn about some of the tools that scientists use including magnifiers, charts, measuring tools, and science journals.
Check out Sid the Science Kid mobile apps here! 
To download podcasts that discuss various topics in the lives of preschoolers from a parent and educator perspective, click here! 

CLICK ON THE IMAGE- WEBSITE SID THE ENGLISH KID

MEET THE CHARACTERS


EARLY EXPERIENCE:SCIENCE WITH WIND

Wind 

Link this activity with looking at wind farms and working windmills.
"The Wind at work ": An Activity guide to windmills, 

Making a windmill 

You will need
Coloured card
A piece of thin dowel 30cm long (thick enough not to split when a nail is knocked through)
A bead
A large headed nail or a nail and a small button
Glue
Hammer
This activity will need an adult to make the holes and hammer the nail through into the dowel.


  • Cut a square of thin card 20cm x 20cm, (to make a two coloured windmill as shown above, cut two pieces of card of differing colour and glue them together)
  • Draw the diagonals in lightly and then cut along them inwards from each corner for about 11cm, as shown top right.
  • Make five holes in the square, one on one side of each corner cut and one in the middle again as shown top right. The corner holes need to be big enough to allow the windmill to turn, but not too big
    so that the nail head can go through.
  • Curl each half corner with the hole in towards the middle and then using the large
    headed nail, (if you haven't got a nail with a big enough head try threading on a small button) thread it through the holes and then through the hole in the middle. The shape of the windmill should now be made, as shown centre right.
  • Thread the bead onto the nail behind the windmill to allow the windmill to rotate freely without knocking against the dowel.
  • Using a hammer knock the nail into the dowel. If the nail goes out through the other side, hammer it flat against the dowel and cover with a small piece of tape.
  • Let the children test the windmill by blowing onto it from different angles to see which makes the sails turn the easiest and fastest.
  • Take the windmills outside to see if there is enough wind to make them turn. Again turn the windmills round to see if they turn more easily if they are facing a certain direction.
  • If there isn't very much wind let the children either run with the windmill
    or swing it round to see what happens.

Flags 

A simple activity for looking at the effect of wind.
You will need
Garden canes or similiar sticks
Thin material (cotton or lining materal)
Glue
  • Cut different shapes, eg rectangles and triangles out of the material.
  • Glue the material onto one end of the cane, rolling it so that there is a complete turn of material, leave until dry.
  • Take the flags outside to see if there is enough wind to make the flags fly. If the flags fly look at which material flew the easiest.
  • Hold the flags low down to the ground and then up high to see if there is any change.
  • Leave the flags outside in the ground and record each day if the flags are flying and which direction they are flying.

EARLY EXPERIENCE: SCIENCE WITH SOUND

Sight and Sound


Investigate how sound travels by making earphones

You will need 
 Yoghurt pots or plastic cups
5m lengths of string
Paper clips

This activity works well if the children are able to work in pairs. 
To make the earphones:
  • Poke a small hole carefully in the bottom of the pot/cup. (This should be done by an adult)
  • Decorate the pot/cup.
  • Thread one end of the string through the hole of one of the pots from the bottom up so that the string end comes up in the pot/cup.
  • Tie the end of the string to a paper clip to prevent the string slipping through the hole.
  • Do the same with another pot/cup.
  • Ask the children to hold onto their cup and walk away from each other until the string is taught.
  • Take it in turns to speak quietly into the cup and listen with the pot/cup held against the ear.
  • What happens if the string is not taught?
  • Explain how the cup vibrates when you speak into it which makes the string vibrate and then the cup next to the ear which all makes the sound travel.
  • Discuss sound with the children.
'The Best ears in the World': A first look at sound and hearing, Claire Llewellyn.

EARLY YEARS EXPERIENCE: SCIENCE WITH MAGNETS


Magnets

Charm a snake or fly a kite

To show how magnetic forces work by making the snake or kite rise up.

You will need

Paper to make spiral snake or kite
Thread (long enough to pull up with the snake/kite)
Paper clips
Magnets
Small amount of Blue Tac
  • Make either a spiral snake or kite with a tail out of paper.
  • Attach a length of thread to the tail of the snake or kite and then using a small blob of blue tack attach it to the table.
  • Attach the other end of the thread to a paper clip and then fasten the paper clip to the
    snakes’ head or kite top.
  • Hold a magnet above the snake or kite and hopefully they will rise up as the magnet is lifted.
  • Discuss with the children why the magnet made the snake/kite rise.

EARLY YEARS EXPERIENCE: SCIENCE WITH FOOD AND DRINK

Food and drink

Fruit Salad

You will need

A selection of fruit, eg Kiwi, Peach, Pineapple
A bowl
Sharp knife
Cutting board
For safety the fruit should be cut be an adult.
  • Before cutting the fruit, pass the different fruits around and let the children feel and smell them.
  • Ask the children if they know the names of the fruit.
  • Talk about shape, size, smell and texture.
  • Put the fruit into groups, eg smooth skinned or those that are round in shape.
  • Ask the children to guess what colour the fruit is inside.
  • Peel and cut open the fruit, and talk about what they can see.
  • Are there any seeds?
  • If you cut the fruit in a different way, does it look different inside? Apples are great for this.
  • Make the fruit into a fruit salad and let the children taste the fruit.
  • Discuss which fruit the children prefer.
This activity links well with the book Handa's Surprise. 

Cooking Popcorn

Looking at the change in popping corn when it is cooked.
You will need
Popping Corn
A large saucepan with a lid
Cooking oil
A bowl
Sugar
You can buy microwave popcorn, which is easier to cook but not quite as much fun.
The popcorn should obviously be cooked by an adult for safety reasons.
  • Look at the corn: because it is small it might be useful to have some small hand lenses to look at it.
  • Talk about the size, colour, shape and texture.
  • Cook the popcorn.
  • Talk about the smells and sounds as the popcorn cooks.
  • When the popcorn has cooled look at the changes in colour, texture, shape and size.
  • Sprinkle with sugar and let the children taste the popcorn.

To cook the popcorn


Put a tablespoon of oil into the saucepan and half a cup of corn.
Give the corn and oil a stir so the corn is coated with oil.
Put the saucepan over a high heat,making sure the lid is tightly on.
When the corn starts popping carefully give the saucepan a shake.
Listen to the popping: when the pops gradually stop peep inside to check that all the corn has popped.
Remove the pan from the heat and put the corn into a bowl. It can still be quite hot so leave it to cool for a while before the children touch it.


Why does popcorn pop?

A popcorn kernel has approximately 12% water content and when it is heated quickly the moisture turns to steam and expands. When a certain temperature is reached the expanding steam causes the hull of the kernel to explode.

Different ways of cooking potatoes

To compare potatoes and look at the changes that take place when they are cooked.

You will need
A variety of potatoes, eg jacket, new, sweet.
Sharp knife
Cutting board
Peeler
Cooking pans (depending on which way you are cooking the potatoes)
Boiled and mashed potatoes are obviously the easiest to cook. Other ways of cooking potatoes could be shown by bringing in pre-prepared food or by showing photographs from magazines.
All cutting and cooking should be done by an adult.
  • Before preparing the potaoes for cooking, pass them around letting the children feel the texture of the skin.
  • Talk about the shape, colour, texture and size.
  • Ask the children to name as many ways as they can that potatoes can be cooked.
  • Talk about how you prepare the potatoes for cooking, eg washing and peeling and show the children how the peeler works, including safety factors.
  • Cut the potatoes in different ways to show how they are prepared for boiled, chips and crisps.
  • Cook the potatoes.
  • Talk about the change in the appearance. If the potatoes have been boiled and left to cool they could be mashed by the children.
  • Let the children taste the cooked potatoes and discuss which sort they prefer.
Also potatoes are good for printing too.

POTATO PRINTING

POTATO PRINTING
This activity can be linked to the rhyme:
One potato, two potato,
Three potato, four.
Five potato, six potato,
Seven potato more...

The children can then add:
I like mashed potato,
Can I have some more, pleeese....

Continue with one potato, two potato, and add new choices of cooked potato, roast, jacket into the rhyme.
 

EARLY YEARS EXPERIENCE: SCIENCE WITH COLOURS

Colours

Separating Inks

Looking at inks and investigating how the chemicals separate in water.

You will need

Strips of Blotting paper
Felt pens including several different black pens
Several plastic transparent pots with a couple of cms of water in each pot
Straws
Pegs
  • Draw a circle of colour at the bottom of each strip of blotting paper using a variety of coloured pens.
  • Suspend each strip of blotting paper from a straw using a peg as shown so that bottom of the paper dips into the water allowing the water to then soak up through the paper.
  • Ask the children if they can guess what might happen.
  • Watch the paper absorb the water and discuss what is happening to the picture.
    To extend the activity we could:
  • Each child could then do their own drawing on a dry piece of blotting paper using several colours and dip it in the water as before.
  • Draw some circles using the different black pens.
  • Ask the children if they think the black ink will stay the same colour or will it change when dipped in the water.
  • Compare the results from the different black inks, hopefully there will be some differences.

How to get the colour Green 


You will need:

2 glasses or jars with drinking water
1 jar
food colouring (yellow and blue)

I have used water and food colouring. First of all, I tinted a glass of water with the yellow food colouring, and then I did the same with the blue colourant. Depending on the size of the container you need to add more drops of food colouring. Later I poured the two glasses in a jar and... I got the colour green! Because I used food colouring,   children can drink it. They will love it!


Another activity you can  try with your students providing that if you mix yellow + blue= green. Test with paint and children will find out that the result is the same. Also you can do this experiment with the rest of the colours.

If you have more ideas. Why don't you share in here!

jueves, 17 de abril de 2014

EARLY YEARS EXPERIENCE: SCIENCE WITH WATER

Science -Water Activities

Children love playing with water, so activities involving water are always enjoyable. Simple changes can add new experiences, for example using warm water, cold water, soapy water, coloured water or adding salt. Containers of different shapes and sizes, sieves, water wheels and funnels can also be added to extend the activity.
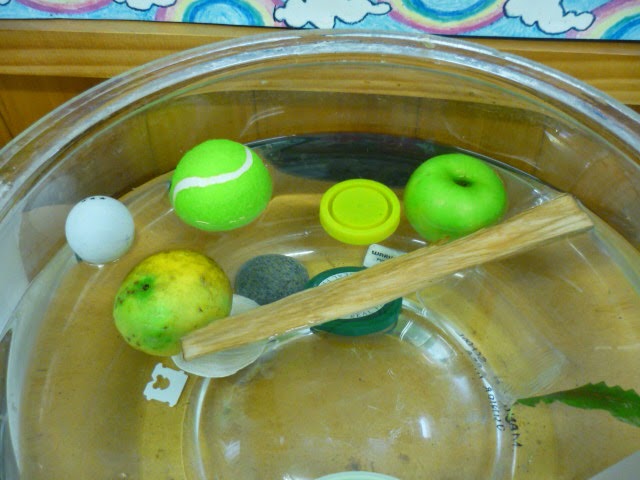

Floating and Sinking

You will need 
Water Tray or a large bowl full of water
Various objects of different size, shape, weight, maybe include something with holes
2 containers or plates to put the sinkers and floaters on separately
Paper and pencils to record the results
  • Select a variety of objects with the children.
  • Talk about the size, shape and weight of the objects.
  • Ask the children to guess which objects will sink or float.
  • Place the objects in the water one at a time.
  • Talk about what happens to the object: if it floats, which way up is it, is it on top of the water.
  • Sort the objects into sets, those that float and those that sink.
  • Talk about their predictions, were they correct, and encourage the children to discuss what they think makes something sink or float.
  • Record the results with simple drawings on two halves of a page.
This activity can be extended by using small plastic trays and floating them on the water. Gradually get the children to add small bricks or other objects to see how many the tray will hold before it sinks.

Looking at Ice

You will need
A balloon
Tray or large plate
Water
Food colouring (optional)
This activity will probably need to be prepared in advance if ready access to a freezer is not possible.
  • Before making the ice ball, talk about water and when and how it freezes, maybe using reference books to show pictures of ice.
  • If you have already prepared a frozen balloon, you could still show a balloon being filled with water and let the children feel it, before bringing out the frozen one.
  • When you bring out the frozen balloon compare it with the one filled with water.
  • Talk about any changes the children notice.
  • Tap both balloons with a small hammer or drum stick, what's the difference?
  • Touch both balloons, but be careful with the frozen one as it may burn small fingers.
  • Cut the balloon off the frozen water, put it on a deep tray and let the children look at the ice.
  • Talk about what they can see.
  • Ask the children about what will happen to the ice if it is just left on the tray.
  • Ask if they know how to make it melt faster.
  • Leave the ice to melt, but get the children to look at it every 15-30 minutes depending on the temperature of where the ice is.
  • Record the size of the ice as it shrinks using black paper and chalk.
The frozen water can be made more interesting if food colouring is added to the water before it is frozen.
In the summer months it might be fun to extend the activity by making Ice lollies.

Exploring Bubbles

All children love bubbles so this activity will be a successful.
You will need

Bubble blowers, bought and hand made, (for hygiene reasons enough for each child to have their own blower)
Some suitable solution to make bubbles
Container for the bubble solution
To make some blowers, plastic covered garden wire (medium thickness) and some tape to bind the handle.
A cloth is useful for all the drips especially inside where it can make the floor slippery.
Care should be also taken with bubbles bursting near children's eyes.
Bubble activities can be done anywhere but can be more fun outside as any breeze will carry the bubbles away; if it is damp outside the bubbles will also last longer.
  • Ask the children where they might see bubbles at home, when washing up, bath time etc.
  • Using some bought blowers let the children blow some bubbles.
  • See who can blow the biggest or the most bubbles.
  • Talk about the shape and size of the bubbles.
  • Look closely at a bubble while it's still attached to the blower: can the children see any colours?
Make some different shaped blowers using the garden wire, make a shape and then twist the two ends of the wire to form a handle. If the ends of the wire are sharp bind them with some tape or fabric plasters.
  • Talk about the shape of the hand-made blowers and ask the children what shape bubble they think they will make.
  • Let the children blow the bubbles and see if they were right.
  • Record their findings, draw the shape of the blower and next to it draw the shape of the bubble it makes.
  • Ask the children what they have learnt from this.
The activity could be extended by doing Bubble painting for some ideas.
Bubble painting