ENGLISH INFANTS, ENGLISH PRIMARY, ENGLISH INFANTS&PRIMARY, SPECIAL NEEDS, PARENTS

Mostrando entradas con la etiqueta CRAFT IDEAS. Mostrar todas las entradas

jueves, 1 de mayo de 2014

CRAYOLA FOR PARENTS


For Parents


Every child is wonderfully creative. So let’s give them the power to colorfully express what they’re thinking as they discover, explore and dream.


Crayola, are committed to providing safe, high-performance products that allow kids to engage in worry-free creative play. When kids have the right tools to create, they are free to turn their dreams into visible form!  Nuture and celebrate the colorful creativity in every child! For more information visit Crayola web.      

52 Creative Weeks
Being creative with your kids is fun, easy, and important. As hectic as life can get, be sure to do at least one creative activity each week with your kids. Stimulating your child's imagination, listening to your child's ideas, and spending time doing creative activities together are keys to their success.

CLICK ON THE IMAGE- WEBSITE CRAYOLA 

Click here to print out a full list of 52 Creative Ideas for 52 weeks of fun!

Color Wonder

Explore the magic of color without the mess! Color Wonder is a unique ink, developed by Crayola scientists, that appears only on special paper. The ink is clear on most surfaces, but each marker "magically" shows up a different color on Color Wonder paper.
CLICK ON THE IMAGE-WEBSITE CRAYOLA


Stain Tips


The suggestions for removing stains have been compiled as a service to our consumers. They are unable to guarantee or be responsible for the results obtained by these procedures. You may also wish to consult your local cleaner for further recommendations.


Before attempting the stain removal method, test each procedure on an inconspicuous area of the material or surface to be cleaned. Please be advised these stain removal methods involve hazardous products and are intended only for adult use. Crayola does not recommend children attempt these procedures.
In many procedures, specific brands of products are recommended. These are brands that performed most effectively in our laboratory. Always check individual containers for recommended procedures and warnings. Competitive brand products may work equally well.

For additional assistance, contact us toll-free at 800-272-9652 weekdays between 9 AM and 4 PM Eastern Time.

CLICK ON THE IMAGE- CRAYOLA WEBSITE

CRAYOLA FOR EDUCATORS


 Crayola has had a long-standing relationship with educators, providing quality products for the classroom and students’ home projects. Crayola website you will find  artful lessons, classroom resources for all levels of creativity. For futher information visit Crayola web.

Articles & More

Here you will find a variety of articles and downloadable assets that will aide in enhancing your students’ learning experiences both in and out of the classroom.

Lesson Plans

In this site you will hundreds of artful, standards-based lesson plan ideas designed to integrate the arts into the daily curriculum and stimulate independent thinking through visual learning.


  Lesson plans are divided into categories and products. Also the Lesson Plans are slipt into grades:


miércoles, 16 de abril de 2014

EARLY YEARS EXPERIENCE: CRAFT IDEAS FOR CARNIVAL


CRAFT IDEAS - CARNIVAL


Carnival Masks

Celebrate Carnival and Mardi Gras by making masks out of card and then decorating them with feathers, glitter, sequins and beads.
To get the best results when printing the Carnival worksheet, make sure your left and right margins are set to no more than 10mm (use File, Page Set up to adjust this).
 Carnival worksheet to be print


EARLY YEARS EXPERIENCE: CRAFT IDEAS FOR CHRISTMAS


Craft Ideas - Christmas

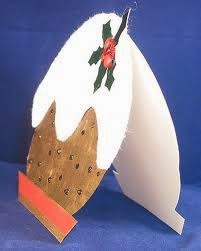
Christmas Pudding Card

You will need:

White card

A small amount of green card

Several shades of brown tissue paper
Red tissue paper
Glue

Cut out a piece of white card approximately 20cm x 10cm and fold it in half, to make a card 10cm x 10cm.

With the fold to the left, draw a pudding shape on the card making the left side of the pudding straight for about 4cm as shown.

Keeping the card folded, so that the back and the front will be the same, cut out the shape.
On the front of the card glue small pieces of the brown tissue paper all over until it looks like a pudding. Leave to dry.
Using the top of the card as a template, draw out the sauce shape on another piece of white card, making the bottom look like the sauce pouring down the sides.
Glue this on top of the brown tissue at the top. 
Cut two or three Holly leaves from the green card, and glue these on top of the pudding, adding small scrunched up balls of red tissue for berries.

Snowman Card

You will need:

White and pale blue card (for card base and snowman)


A small amount of black, orange,and brown card and a choice of coloured card for the scarf (alternatively a small piece of material could be used)

White paint
Glue

Cut a square of pale blue card 15cm x 15cm and fold in half to form the card base. From the white card cut a rectangle 15cm x 4cm and glue this at the bottom of the front of the base to give the appearance of snow. Then using some white paint let the children fingerprint snow falling on the area of blue card left showing as above. Set aside to dry.
To make the snowman cut two circles from the white card, one 10cm diameter and the other 5cm diameter. Glue the small circle onto the larger one, overlapping it slightly.
From the black card cut a hat (use the top of the snowman's head as a pattern for the top), two eyes and two buttons. From the orange card cut a carrot nose and from the brown card cut some twig arms. Glue these into place. From your chosen card or fabric cut a scarf and again glue into place.
If the card base is dry, glue the snowman into place; you could add a touch of clear glitter glue to make the snow sparkle.
To make the cards more individual, use different hat styles or noses.

Finger Print Christmas Tree Card

You will need:

White card
Coloured card for the tub
Brown card for the trunk
Green paint
Glue
Glitter
Either ribbon or card for the bow


Out of the white card cut two identical triangles with a 10cm base and a perpendicular height of 12cm as shown.
Cut two trunks out of the brown card about 4cm(width) x 10cm(height).
To make the tub using your chosen coloured card cut a rectangle 12cm x 4cm, then fold it in half to form a sturdy base.
By repeatedly painting one finger with the green paint, print the tree shape onto one of the triangles. Working up from the bottom, build up the layers to look like a tree. You could also print the other triangle for the back of the card and maybe leave it undecorated.
While the tree is drying open up the tub and on each inside, glue a trunk positioned in the middle but glued from the lower edge to add strength. When dry, refold and decorate the front of the tub with either a bow as shown or your own design.(Make sure the fold is on the left as you look at it).
Decorate the tree as you wish using sequins, glitter etc. Add a star and glue onto the trunk leaving just a small amount of trunk showing. Glue the other triangle to the other trunk in the same way.


3D Christmas Card

You will need:

Coloured card for the tree top, trunk and container
Paint, sequins etc to decorate the tree
Glue
Paper or thin card to make the template

To make the template:
Cut a rectangle 12cm x 20cm out of piece of paper or thin card. Fold the card in half so it is now 6cm wide and draw three horizontal lines to divide the card into four equal sections
as shown. 
Use the the top three sections to form the main part of the tree. It may be easier to draw a line from the top to the side to give the basic triangular shape before drawing the branches. Then draw the trunk and container in the bottom section, the base of the container should measure about 2.5cm.

Cut out the whole shape and then open it out.
Using the template cut out two trees from your chosen coloured card. The trees can now be decorated and the trunk and container covered in your choice of coloured card or paper. Each cut out tree will need to be decorated on both sides.

Once the decoration is complete, cut one of the trees from the top 10cm down to the centre and the other 10cm from the bottom to the centre. The trees should now slide together to form a cross at the base. To hold the tops together a star could be added.

Snowman Bookmark

You will need:
Blue card
White paint
Black pen
A selection of other coloured pens
Hole punch
Thin coloured cord or embroidery silk to make a small tassel
 Cut a rectangle 15cm x 5cm out of the blue card,
With the white paint and using a thumb print for the body and a finger print for the head, print several snowmen down the card. The number you can print will depend on the size of the child's fingers. Leave the snowmen prints to dry.
Using a black pen add a hat, some eyes and buttons. Then add noses; these can be orange as shown to represent an orange or a carrot and then add some scarves in the colours of your choice.
To complete the bookmark, punch a hole at the bottom and add a tassel.
Make the tassel by cutting five 12cm lengths of coloured cord or embroidery silk. Fold the lengths in half by looping them over your finger, then push the looped ends through the small hole on the bookmark from the front to the back. Allow enough to pull the loose end through the loop and tighten up like a tying a tie.
If you have access to a laminator the bookmarks can be laminated to make them more durable. This obviously needs to be done before you punch the hole. Once laminated, trim round leaving a small overlap so that they are completely sealed and finish off as above.

Robin Bookmark

You will need:

White or pale coloured card
Brown and red paint
Fine black pen
Hole punch
Thin coloured cord to make a small tassel
 Cut a rectangle 15cm x 5cm out of the card and taper one end as shown.
With the brown paint and using a thumb print for the body and a finger print for the head, print four or five robins down the card. Leave these prints to dry before putting a red finger print on top of the body to make the red breast.
With the black pen draw in an eye, beak, legs and a little tail on each robin.
Punch a hole at the point at the bottom of the bookmark and make a tassel out of the cord.
If you have access to a laminator the bookmarks can be laminated to make them more durable. This obviously needs to be done before you punch the hole. Once laminated trim round leaving a small overlap so that they are completely sealed and finish off as above.

Reindeer Bookmark

You will need:

Brown card for the head and main section
Small amount of red, pink and beige or white card for the nose, inner ears and antlers
Paint or pens to make the eyes and mouth
Glue


 Cut a rectangle 15cm x 2.5cm from the brown card for the main section. For the head again using the brown card draw two overlapping circles, one circle with radius 1.5cm and another with radius 2cm as shown and cut out along with two ears. 
Two smaller inner ears can be cut from pink card and a round nose from the red card. 

To make the antlers the same, fold a small piece of either cream or white card in half and draw an antler shape. Cut them out while still folded.

To assemble the bookmark, first make the head. Glue the inner ears to the outer ears and then glue them to the main part of the head. Add the antlers and nose and paint or draw on the eyes and mouth.

Finally glue the rectangle of brown card to the back of the head to form the completed bookmark.

Christmas Tree Advent Calendar

Counting down the days to Christmas can be fun and by making their own advent calendar, children can improve their number skills as well as be creative.

You will need:

A hand-print Christmas tree for the base
Card for the baubles
Paint
Glue
Sequins, glitter etc for decorating the baubles
Paper or cut out pictures for inside the baubles
Small amount of Blu-Tack

Make a Christmas tree out of hand-prints, (1 metre high is probably the smallest it could be for the size of baubles shown), and add a trunk and tub at the bottom.
Cut 24 rectangles 8cm x 4cm out of the card. Fold each piece in half and draw a circle to fit but overlapping the folded edge slightly about 1-2cms as shown. With the card still folded cut around the shape except along the folded edge so that you are left with a hinge. When all 24 circles are cut out, the front of each one can be decorated to look like a bauble using paint, glitter and sequins.
To make the baubles look more authentic a small piece of silver paper or foil could be glued on the top of each one to look like the metal hanger.
Inside each bauble either get the children to draw pictures or glue cut pictures from old Christmas cards or magazines.
When all the baubles are completed the children can help glue small numbers onto each bauble and then glue them onto the Christmas tree. A small piece of Blu-Tack will hold the baubles shut until they get opened.


Street Advent Calendar

You will need:

A selection of coloured card
Paint
Glue
Glitter 
An alternative advent calendar that can be a great group activity is a long street of terraced houses.
Each house can be made separately by a couple of children from a standard shape and then glued side by side to form the street. The fun is making each house individual by making each door a different colour and style, adding letterboxes and door knobs.
The windows can be all the same size using a rectangle of paper, which is then decorated with a tree or candles as shown. The frame is then glued on the top. Not all of the windows in each house have to be decorated, some can remain just plain as though the lights are off.
In this calendar, it is the doors that are numbered and opened to reveal a picture. To achieve this, glue the doors on separately down one edge so that they can be opened. The children can draw or paint a little picture to go behind their own door.

Angel Advent Calendar

You will need:

White card for the body and wings (the wings could be made from netting or some other suitable material)
Large bead or compressed paper ball, usually available for craft stores for the head
Wool or strips of crepe paper for the hair.
Length of dowel and small block of wood for the stand
Glue
Silver glitter
for decorating the dress and wings
Paper or cut out pictures for inside the advent windows
Small amount of Blu-Tack
Paint
Craft knife (For adult use to cut the windows)


Cracker

You will need:

Card
Tissue paper
Crêpe paper
Cracker snaps
Thread or ribbon
Wrapped chocolate and/or a small gift
Your own joke
Glue
Help of a kitchen roll sized tube or a rolling pin
Start by making a tissue paper hat to go inside the cracker. Choose a piece of tissue and cut a piece 15cm wide, that is long enough to go round a head with at least 2cm overlap. (It is probably best to measure either an adult's head or child's depending on who the cracker is for).

Cut one of the long side to a design that you like, eg in a zigzag, to form a crown, 2 curved shapes to look like a pirate's hat or a wavy edge to look like petals. Decorate the hat as required and then glue the two short sides together, adjusting to fit before the glue dries.

For the cracker 
Out of card cut:

2 pieces 6cm x 15cm, and 1 piece 10cm x 15cm

1 piece of crêpe and 1 piece of tissue both 30cm x 18cm
Glue the three pieces of card onto the tissue as shown. Using a kitchen roll tube or rolling pin to help you get an even shape, roll the tissue and card to form a tube, remove the roll/pin. Wrap the piece of crêpe paper around the tissue and card, overlapping by 3cm and glue into position.

Place a cracker snap through the cracker and then using the thread or the ribbon, tie around the cracker at one end in between two of the pieces of card and pull reasonably tight. Drop a gift, chocolate, joke and folded hat into the centre of the cracker and then tie up the other end.

Decorate the cracker using glitter, sequins or cut out shapes. Fringing the ends of the cracker can also look pretty.

EARLY YEARS EXPERIENCE: CRAFT IDEAS FOR EASTER

Craft Ideas - Easter

Decorating eggs for Easter


You will need:

Eggs
Acrylic paint
PVA glue
For decoration:
Coloured foil
Small pictures (eg from magazines)
Matt acrylic varnish
This is a fun activity around Easter time. For a more permanent egg, you will need to blow out the contents as described below. If you just want them to last a few days over Easter, you could just hard boil them before decorating (this is probably easier for small children).


To clear the egg (adult activity!)

  1. Carefully use a pin to pierce the eggshell at both the top and bottom.
  2. Gently blow out the contents of the egg into a bowl.
  3. Wash the egg by running under a tap and then dry; wash hands and mouth well afterwards.

To decorate

Decoupage

Using acrylic paint, paint the egg with your chosen colour and allow to dry. Using scissors cut out small pictures from a magazine or similar, or make your own designs. If the pictures are too big, they won't bend around the egg.
Glue the back of your chosen picture and position it on the egg, and smooth down. Continue to do this with other pictures until you have finished decorating. Leave to dry and then paint the egg with the matt acrylic varnish.

Mosaic pattern

As an alternative to painting the egg, you could cover the egg with small pieces of coloured foil (cut into squares), to form a mosaic pattern. Once the egg is covered and the glue dry, paint all over with acrylic varnish and leave to dry completely.
If you are hard-boiling the eggs, try boiling them with some onion skins, or add a couple of drops of food colouring to the water and see what colour the shells turn. The colours will not be very strong but this is a different way of colouring the eggs rather than painting them. The final colours will also vary depending on the colour of the eggs used. 


Easter Hat and Bonnet

For the Easter Rabbit Hat

You will need

Brown or grey card depending on the colour rabbit you want
Pink card
Small amount of white card
Small amount of black card for top of eyes and whiskers.
From the brown or grey card cut a strip of card 3cm wide and long enough to go round the child's head with an overlap of about 4cm for stapling or gluing the ends together.
Again from the brown or grey card cut two ears and a nose as shown to the right. As children's head sizes vary the length of the nose will need to be adjusted so that it covers the child's nose.
Cut two inner ears from the pink card and a nose end.
Out of the white card cut two semi circles for the top of the eyes and two circles for the area either side of the nose for the whiskers to glue on to.
Firstly hold the strip of card around the head of preferably
the child for whom the hat is intended and mark a suitable position for each of the ears to be glued.
Assemble each ear by gluing the pink inner ears onto the outer ears and as shown then glue them in position on the reverse side of the band of card.
To glue the nose together, first glue the pink nose tip on the end of the nose and then glue the white circles behind so that stick out each side as shown. Cut some thin black whiskers and glue in place.
Glue the nose on to the strip of card positioning it in the middle of the ears. Add the semi-circles of white card either side and either glue a small piece of black card and user a marker pen to make the top part of the eye.
Fasten the two ends of the strip either by gluing or stapling to fit snuggly around the child's head.


Easter Bonnet

You will need:

Coloured card for the main part of the bonnet
Selection of tisue paper
Ribbon
Cut the bonnet out of your chosen coloured piece of card using the pattern shown on the right.
Decorate the front edges of the bonnet with tissue flowers and leaves as shown.
Fold the back pieces of each side round and the back of the top down and fasten to form the bonnet shape. It might be easier to try the bonnet on a child at this point to help you get the best shape.before either stapling it or gluing it in place.
Finish the bonnet byattaching two lengths of ribbon one to each of the lower inside corners, again it may be helpful to try the bonnet on a child to get the correct position.


Easter Egg Card

You will need:

White or Coloured card for the main part of the card
Selection of tissue paper
Paint or crayons
Ribbon
Glue 

Fold your chosen piece of card in half and cut out the shape as shown opposite. With the opening of the card to the right the children can now decorate the eggs to their own design.
The eggs shown were both painted before adding either a ribbon bow
or a band with some tissue flowers.


Easter Basket

You will need:

2 pieces of contrasting coloured card
Tissue paper to line the basket and to make the flowers
Ribbon (an alternative to a tissue flower)
Glue or Glue stick
Choice of large egg or small eggs
Choose one piece of coloured card for the main part of the basket and cut out using the pattern shown to the right.
From the contrasting card cut a strip 2cm x 7cm for the handle, 4 strips 1.5cm x 6cm and 4 strips 1.5cm x 9cm to weave.
Cut the sides of the main section along the dotted lines to the base of the basket.
Using one of the longer strips of contrasting card weave the strip in and out of the cut strips on the sides of the basket by going over the first, under the second, over the third etc. Slide the strip down so that it fits neatly against the base, add a spot of glue to the two overlapping woven card ends to hold the strips together. Then weave the next strip this time going under the first, over the second, under the third to the end, again slide this down to the first woven strip.
Weave the the other two strips to complete one side. Repeat for the other 3 sides. When the glue is dry fold up the sides and fold in the tabs and glue on the inside to form the box.
Glue the handle into place and make small tissue flowers to cover each end of the handle as shown and glue in place. If you prefer a bow could be added instead of the flower, or a group of flowers could be used to decorate the top of the handle.
Add some tissue strips to the box before placing in your choice of egg.


Easter Hen Card

You will need:

Yellow or orange card for the hen and the attached stand
A small amount of red card for the hen's Comb
A small amount of coloured card or paper for the eggs
Selection of paper or card for the straw
Red, orange, and white paint
Glue
Cut out the body, head, wing and stand from
your chosen orange or yellow card. Using the red and orange paint, fingerprint around the bottom of the hen and on the head to make it look less flat. Set aside to dry.
Cut out the eggs; these can also look more interesting if they are speckled with white paint.
(If children do not like getting their fingers covered with paint a tiny piece of sponge can be used to dab on the paint and will give a similar effect).
Cut the Hen's comb and beak and some short lengths of brown/yellow paper or card for the straw.
When all the painted parts are dry the hen can be glued together. With the stand folded glue a few pieces of straw to the bottom end of the smaller section, then glue the body of the hen on top and add more straw and the eggs so the hen looks lilke she's sitting on them.
Glue the sections of the comb on top of the head and add the beak before gluing on to the body. Add the wing and then add the eye, either using a black felt pen or a small circle of black card or paper.


Easter Bookmark

You will need:

Yellow and green card for the daffodil
A small amount contrasting card for the flower pot
A strip of card for the main part of the bookmak
An egg carton
Yellow or orange paintt
Glue
To make the daffodil head, cut off one of the egg holders from the egg carton and then trim it down until it is about 1-2cm high. This will be the trumpet part of the flower and needs to be painted either yellow or orange and set aside to dry.
Cut out the main section of the bookmark, the flower petals, the leaves and the pot as shown to the right.
Glue the stem of the flower in place so that the bottom of the stem is positioned about 2cm up from the bottom. Add the leaves and then pot before gluing the flower petals into place.
Finally add the flower trumpet to the centre of the flower head. 

 A worksheet to be print

Easter Card

You can make a rabbit card for Easter.

Daffodil Card

Make a 3-d pot of daffodils as a Mother's Day or Easter card.
 A worksheet to be print